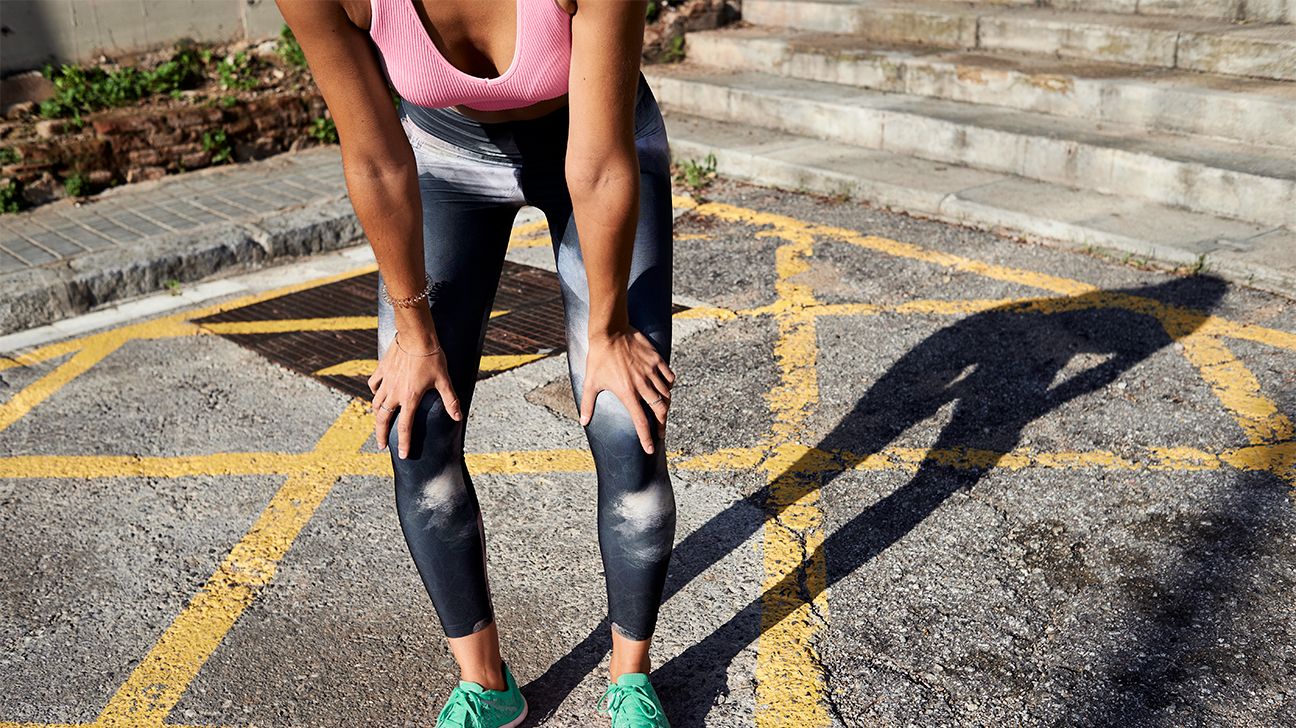
Knee killing you after getting those miles in or a brisk walk? It could be runner’s knee. You don’t actually have to run to get runner’s knee — you might feel the pain after walking or doing any sort of exercise using your knees.
“Runner’s knee” is a common term for pain around your kneecap (aka your patella). In medical speak, runner’s knee is called patellofemoral pain syndrome (PFPS). It comes from irritation of the soft tissues of the knee, which can include the patellar tendon, fat pads, and the synovial tissue that lines the knee joint.
Pain is often around or behind the kneecap. The condition is more common in women, affecting 19 to 30 percent of female runners and 13 to 25 percent of male runners.
Thankfully, there are runner’s knee stretches, exercises, and treatments to help you recover and get back on your feet.
Think you have runner’s knee?
It’s important to note that runner’s knee is often used as an umbrella term, meaning it’s a diagnosis of *what* your symptoms are, but it doesn’t always determine *why* you’re experiencing runner’s knee.
Some causes of runner’s knee:
- kneecaps that are too high in the knee joint
- weak core, hip, leg, and/or calf muscles
- tight leg muscles (hamstrings, hips, quadriceps, calves)
- restricted joint motion at hips, knees, or ankles
- unsupported feet (via ill-fitting shoes)
- bad form when running
- overuse or excessive training (running too many miles)
- direct injury to the knee
If you have runner’s knee, you’re likely feeling pain when:
- walking or running
- going up or down stairs (especially when going down)
- squatting or kneeling
- sitting or standing up
- sitting for long periods of time
You may also notice that your knee pops, grinds, or swells up (ouch!).
Rest is important, but that doesn’t mean you have to lie on the couch for the next week. Try doing the exercises below 3 to 5 times a week for 6 weeks.
Know before you move: These exercises are general suggestions that may help your knee, but a physical therapist can give you a proper evaluation, determine why you have runner’s knee, and create the best course of action for your pain and injury.
1. Hamstring stretch
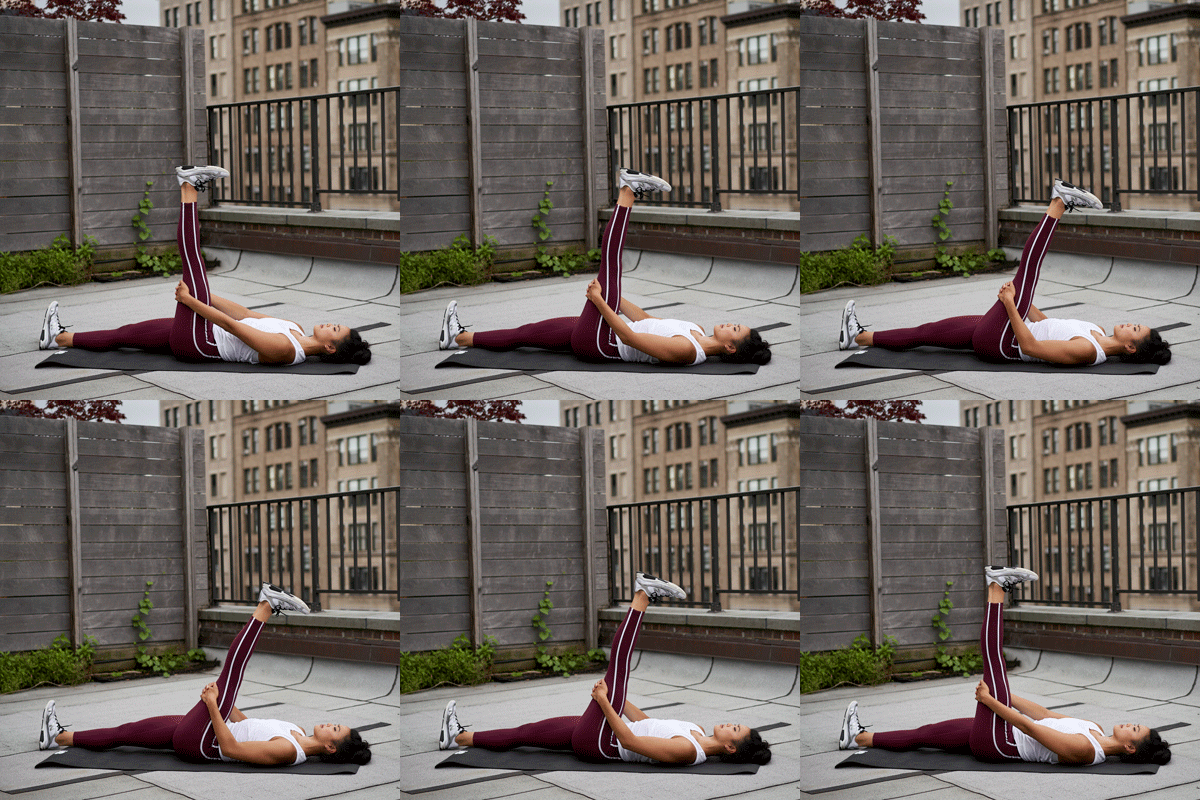
Area targeted: Hamstrings
Reps: 3 per leg
- Lie on your back and extend left leg in front of you.
- Slightly bend right leg and wrap your hands behind right thigh.
- Slowly begin to pull right leg toward you, feeling the stretch in back of thigh.
- Pull leg as close to you as you can, aiming to keep leg as straight as possible and heel flexed and toward the ceiling.
- Hold for 30 seconds, then switch to your left leg.
Pro tip: “I also like standing hamstring stretches with the foot propped up on a step or chair,” says physical therapist Austin Win. “This allows a deeper stretch and to emphasize more hip stability if it’s tolerated.”
2. Side-lying leg lift
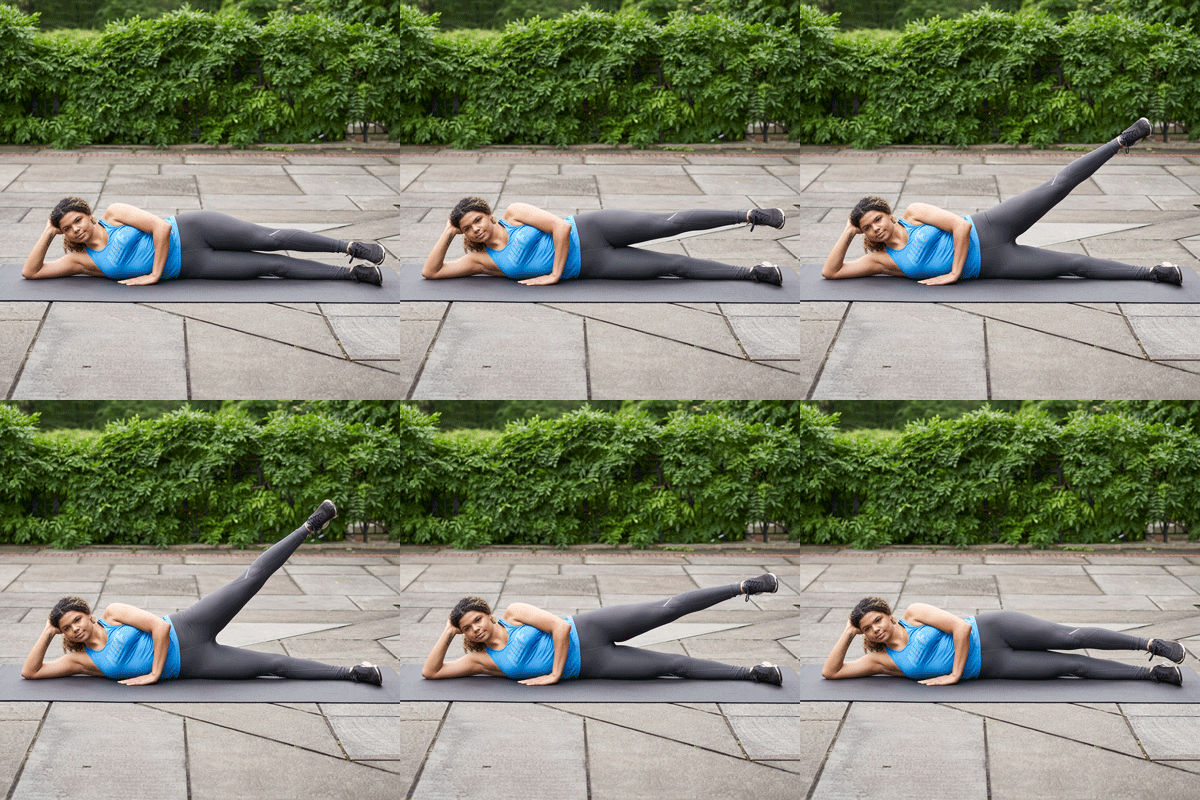
Area targeted: Gluteus medius
Reps: 2 or 3 sets of 15 reps per leg
- Lie on your right side with legs extended and feet stacked.
- Either bend right arm or keep it straight, and rest head on it. Keep left hand in front for extra support.
- Gently raise left leg off right leg. Flex in your side back butt region (right where your jeans pocket would be). (You shouldn’t feel this significantly in your obliques. If you do, you’re targeting the wrong muscle.)
- Bring leg back down and repeat.
Pro tip: If you feel the urge to nap when you lie down, you can easily do this exercise while standing! Stand with feet forward and hands on hips. Lift your right leg off the floor and out to allow the weight to go to your left leg. Bring right leg back down and repeat on the other leg.
3. Straight leg raise/lift
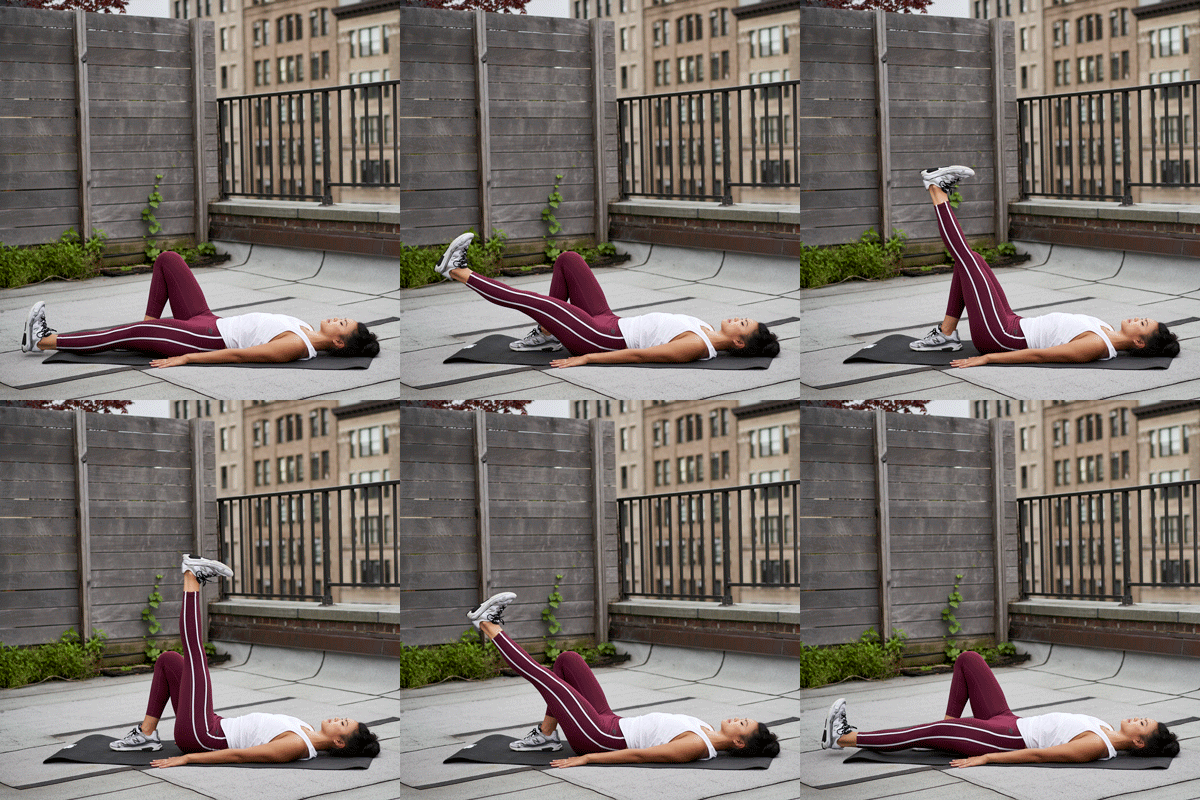
Areas targeted: Quads and hip flexors
Reps: 2 or 3 sets of 15 reps per leg
- Lie on your back, keeping one leg bent at a 90-degree angle and the other straight out on the floor.
- Engage your quads in the extended leg and raise leg until it’s about parallel to bent leg (about a 45-degree angle).
- Hold for about 2 seconds, then slowly lower it to the floor. Repeat.
Pro tip: Don’t hold your breath. Exhale as you lift your leg and inhale as you lower it.
4. Clam exercise
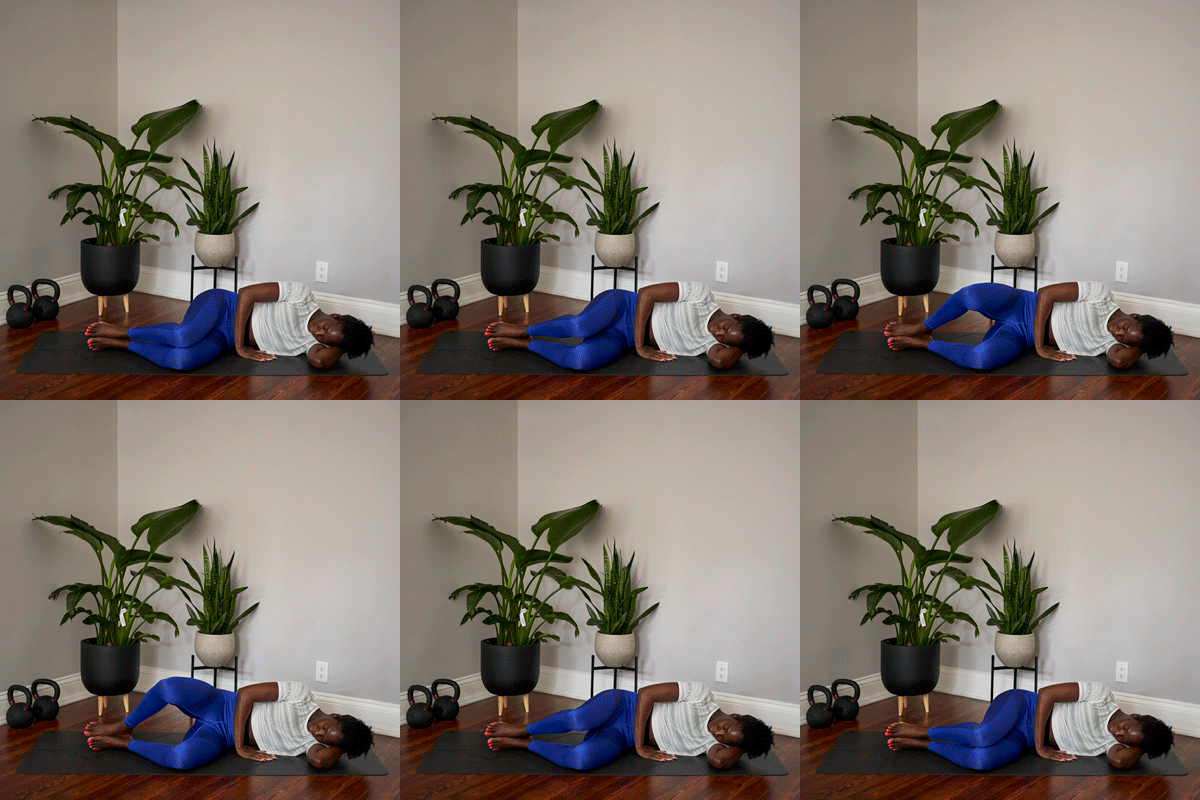
Area targeted: Gluteus medius
Reps: 2 or 3 sets of 15 reps per side
- Lie on your side with knees bent and legs stacked.
- Keeping heels together, open your top leg toward the ceiling to form the “clam” shape.
- Hold for 2 seconds, then lower. Repeat.
Pro tip: If you can handle it, you can add a resistance band around your legs. Also, ensure your neck is in a neutral position so you don’t strain it. You don’t want to have pain in your knee and neck!
5. Wall slide
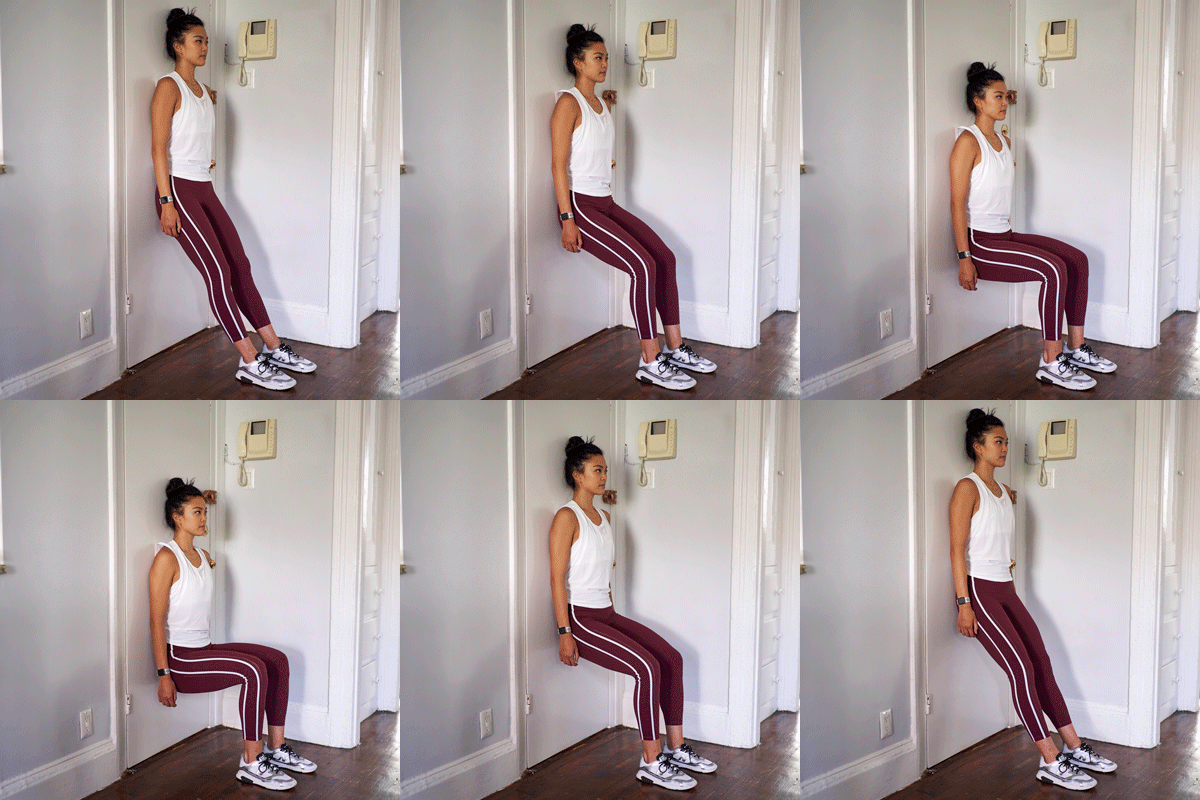
Areas targeted: Quads and glutes
Reps: 2 or 3 sets of 10–15 reps
- Stand with back against a wall. Keep feet about shoulder-width apart and about 6 inches in front of hips.
- Gradually slide your back and hips down the wall until knees are at a 45-degree angle.
- Hold for about 5 seconds, then stand back up.
Pro tip: You can also do this move as a wall squat with a stability ball. Do the same steps, but place a stability ball between yourself and the wall. As you squat down, let the ball roll down with you so it’s always placed behind your back.
6. Standing quad stretch
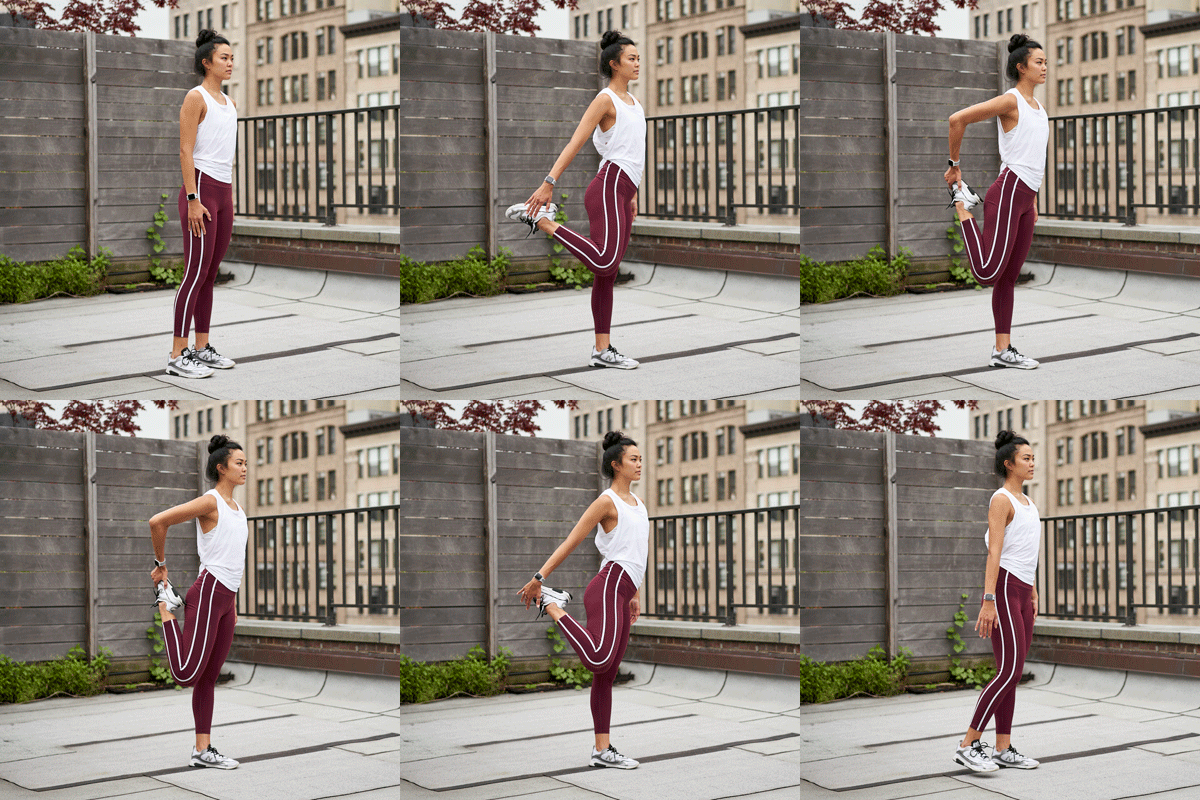
Areas targeted: Quads and hip flexors
Reps: 2 or 3 per leg
- Start standing. Bend your right leg and bring heel toward glutes. Reach back with right hand to grab right foot. Bring right heel as close to glutes as you can without causing pain.
- As you stretch, keep right knee in close and stay upright — don’t lean forward.
- Hold for 30 seconds, then repeat on the other side.
Pro tip: Feel off-balance? Use a chair, a wall, or a friend’s shoulder to keep yourself stable. Also: “Don’t over-flex your hip,” says Austin. “That’s cheating and doesn’t give you the best stretch.”
7. Bridge kick
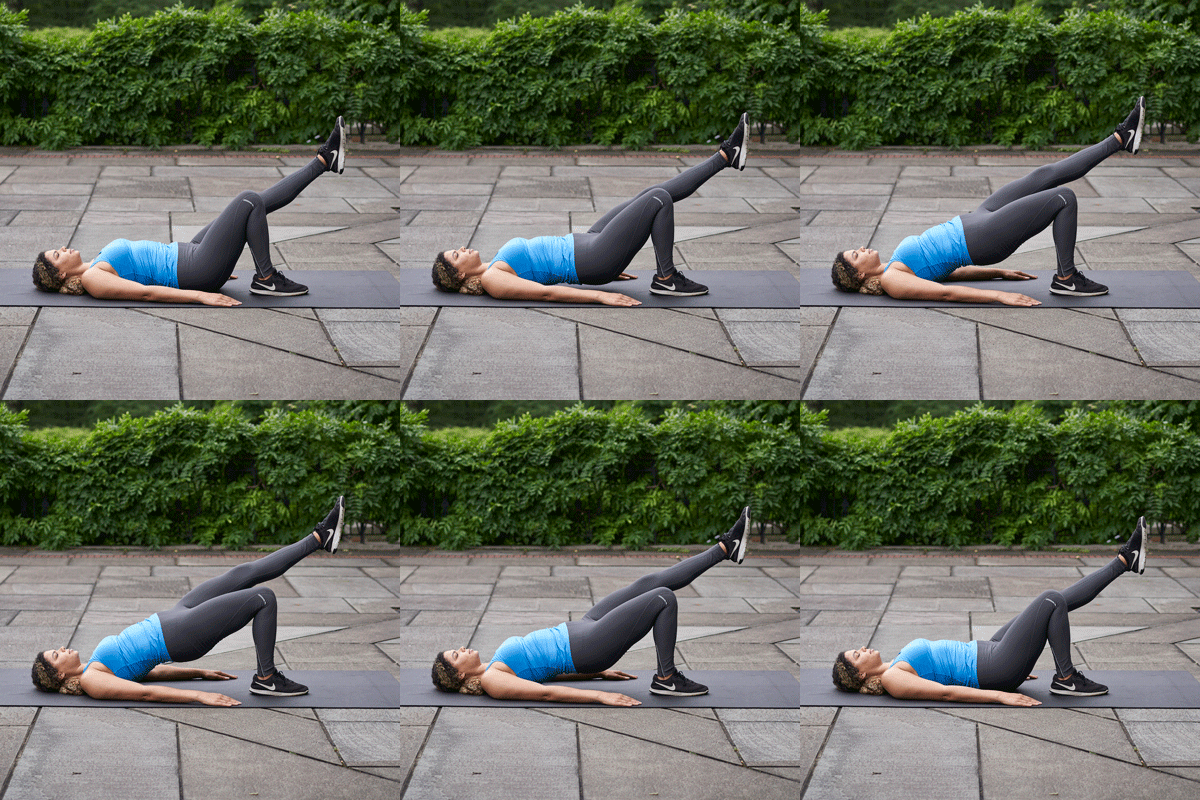
Areas targeted: Glutes and hamstrings
Reps: 1–3 sets of 6–10 reps per leg
- Lie on your back with knees bent toward the ceiling and arms at your sides.
- Lift hips and back off the floor so your body weight is in your feet and shoulder blades.
- Shift your weight onto left foot and slowly raise right foot off the floor until right leg is at a 45-degree angle. Avoid locking your knee.
- Bring right foot back down without touching the floor.
- Repeat, then switch to the other leg.
Pro tip: If the kick is too much on your knee, just raise and lower your butt off the floor. You’ll still be strengthening those muscles!
8. Standing calf stretch
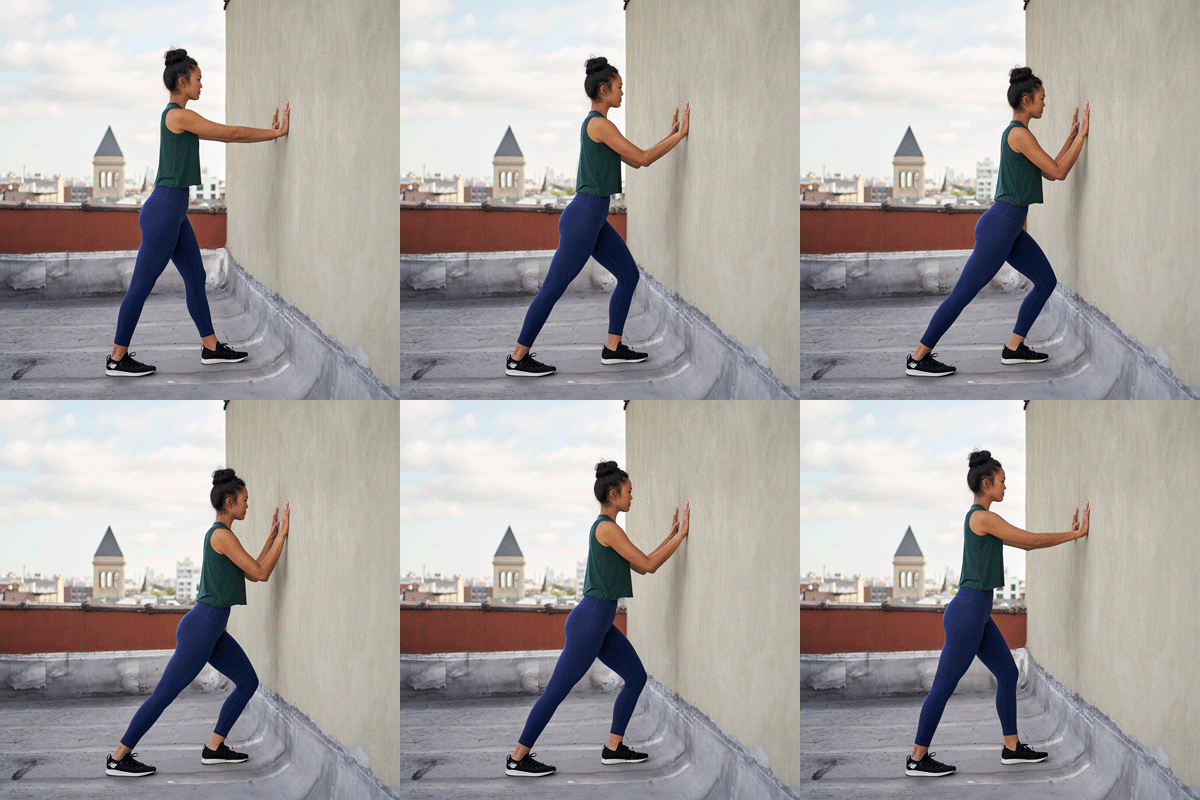
Areas targeted: Calves, shins
Reps: 3 per leg
- Stand facing a wall and put your hands against the wall at eye level. Stagger your legs so one foot is in front of the other at a comfortable distance.
- Keep heels on the floor and move front leg forward with knee bent.
- Turn unbent knee slightly inward and lean into the wall until you feel a stretch in your calf muscle.
- Hold for 30 seconds.
Pro tip: Do this with your injured leg in the back (so it’s the one that feels the stretch). But feel free to do both legs to keep your muscles strong and prevent runner’s knee in the opposite leg.
9. Step-up
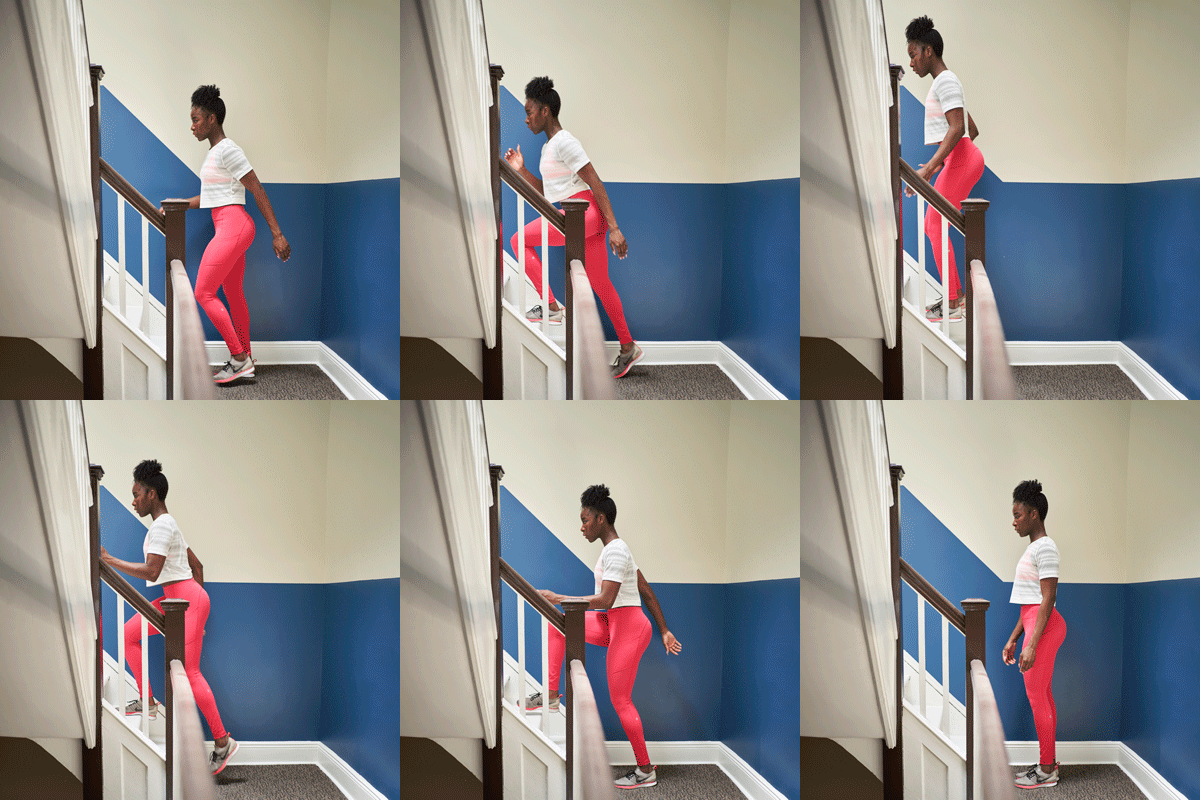
Areas targeted: Glutes and quads
Reps: 2 sets of 10 reps per leg
- Place right foot up on a step or box.
- Press all your weight into right leg, stepping up so left foot is lifted off the floor.
- Hold for a few seconds as right leg straightens and tightens. Step back down and repeat.
Pro tip: If this exercise causes too much pain, skip it! But once you recover, doing this movement will help keep your legs and glutes strong.
10. Donkey kick
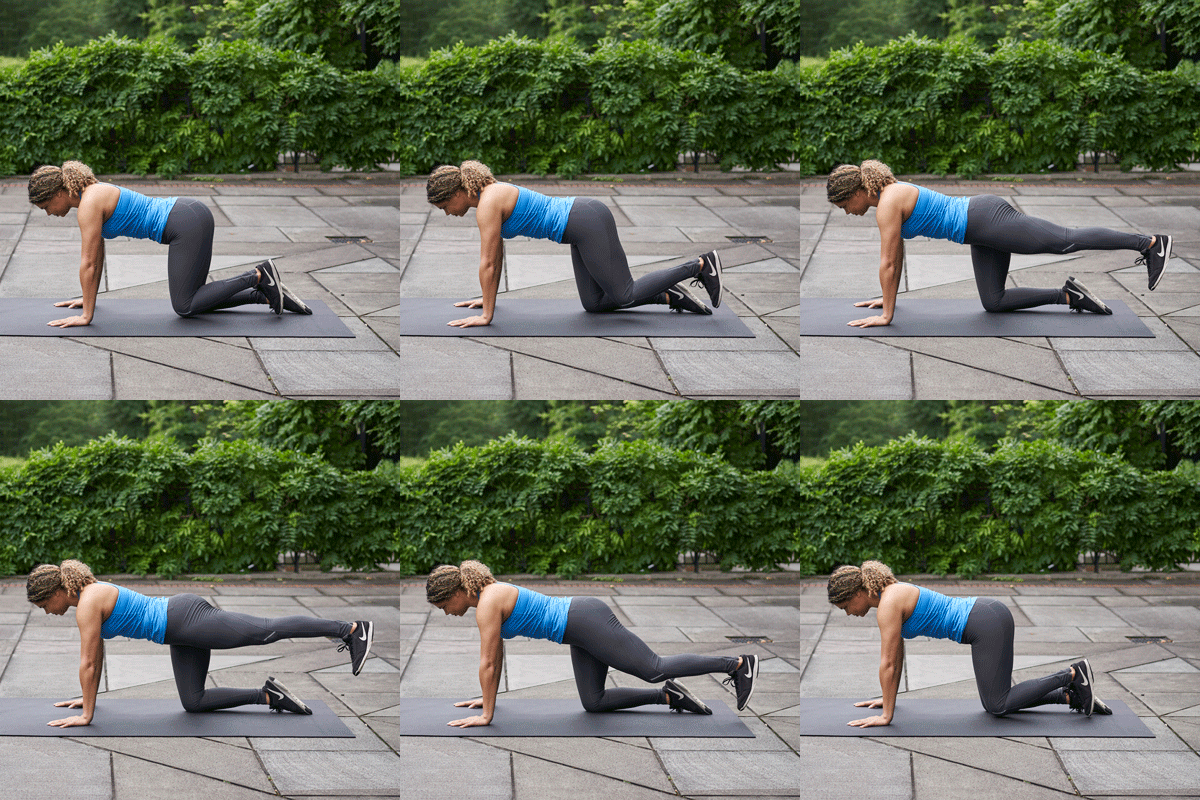
Area targeted: Glutes
Reps: 2 sets of 10 reps per leg
- Start on all fours on the floor, cushioning your knees and hands with a yoga mat, blanket, or towel. Keep arms straight, knees under hips, and wrists under shoulders.
- Slowly lift right leg and extend it behind you. Raise it to about hip height, keeping foot flexed.
- Press your heel up toward the ceiling for a second, then lower it back down. Repeat.
Pro tip: Keep your back flat. If it arches, that means you’re relying on your back muscles instead of your glutes.
11. IT band stretch
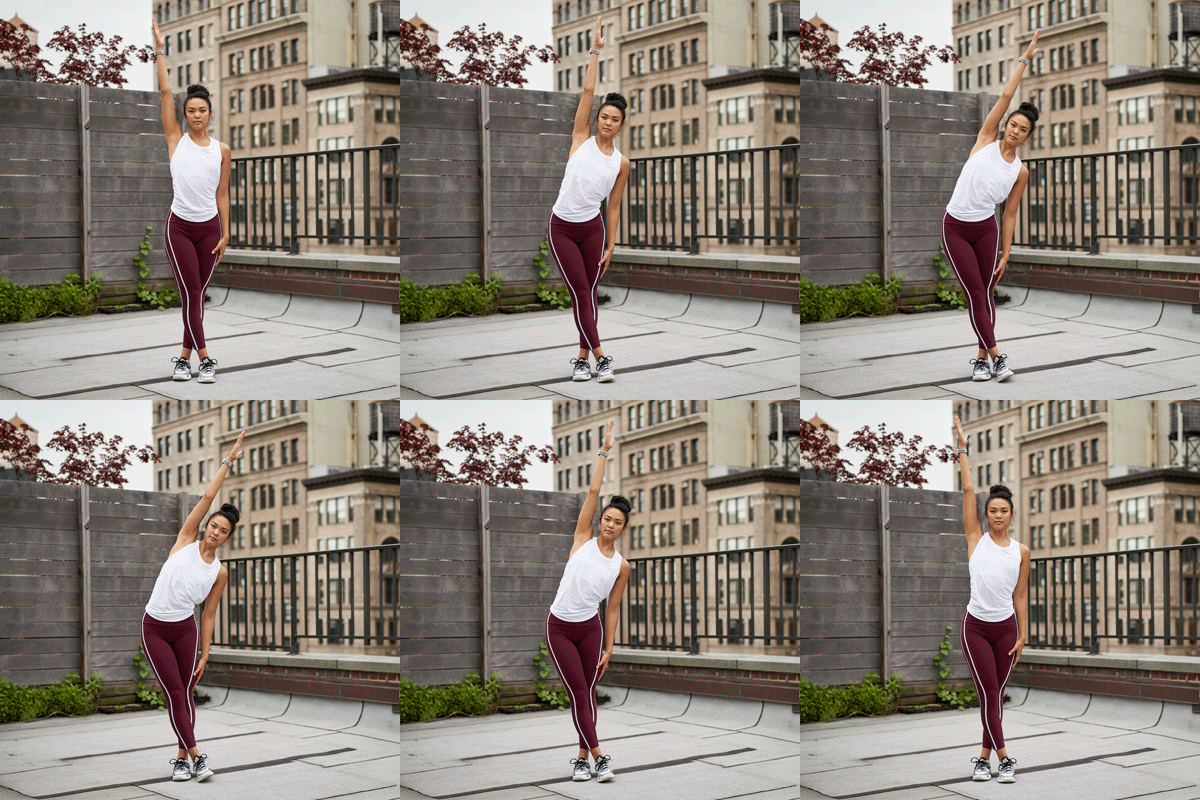
Areas targeted: Glutes, hips
Reps: 2 or 3 per leg
- Stand with right leg crossed over left leg.
- Raise right hand over your head and keep left hand on left hip for support.
- Slowly lean to the left until you feel a stretch.
- Hold for 30 seconds, then repeat on the other side.
Pro tip: Don’t feel like standing? You can also sit for this. Extend one leg, cross the other leg over it with knee bent, and gently pull your knee toward your chest. Twist your upper body and slide your arm over your bent knee. Hold for 30 seconds, then switch legs.
Runner’s knee exercises to avoid!
Some exercises can make runner’s knee worse! Avoid exercises that over-flex the knee, including:
- deep squatting
- hopping
- repetitive stair-climbing
If you’re a runner, also limit the length of time you’re out running or take a break and opt for a different exercise while you’re recovering.
Tape it up. A 2019 review found that taping your knee and foam rolling could also help you out. More specifically, the McConnell taping technique helps to pull the kneecap to the middle (where it should be), which reduces pain and helps prevent it from gliding out of alignment during use.
Foam roll. Studies have also shown that foam rolling can be helpful in reducing fascial adhesions and trigger points throughout the muscle that make it feel “tight.” Just make sure you NEVER roll on a bony area or directly on a joint line (like your actual knee).
Ice it. A little cooldown can help reduce inflammation too. Lay a bag of crushed ice or a frozen gel pack on your knee for 10 to 20 minutes at a time to feel the pain slowly subside.
Pop an OTC pain med. Taking nonsteroidal anti-inflammatory drugs (NSAIDs) like ibuprofen might help the pain. Just talk to your doctor first.
Tips to prevent runner’s knee
- Reduce high impact activity by alternating with low impact activities such as yoga or swimming.
- Gradually increase your mileage and intensity when you run. Don’t go full-out and run 5 miles if you’re not used to it.
- Don’t forget dynamic stretching and a warmup before exercising.
- If you do static stretching (holding a stretch in one place for 30 seconds), it’s best to do that after your workout, not before.
- Make sure your athletic shoes fit and support you properly. Replace your running shoes every 300 to 500 miles.
Research suggests that doing exercises that strengthen the knees and hips 3 to 4 times a week for 6 weeks can help decrease knee pain.
But if nothing is working after 3 weeks and you still have significant pain, seeing a doctor or physical therapist is your best next step.
“Starting with the exercises listed is sufficient for acute pain,” says Win. “From there, I typically would progress them into more functional exercises or runner-specific. This could be jumps, hops, and landing mechanics, which is important to implement before going full on running again.”
You may need further evaluation with a CT scan, X-ray, or MRI to determine if there is an underlying cause.
Win also mentions that recovery really depends on the individual and the diagnosis behind the knee pain. Typically, recovery can take about 6 weeks.

